Description
Software requirements.
1. Java SE Development Kit 7 (JDK 1.7)
Windows x86 (32bit) - jdk-7u75-windows-i586.exe
Windows x64 (64bit) - jdk-7u75-windows-x64.exe
http://www.oracle.co...ds-1880260.html
Setting the JAVA_HOME in Windows 7 (64 bit)
After you have downloaded and installed the Java Development Kit (JDK) in Windows, you must set the JAVA_HOME environment variable to point to the JDK installation directory.
You must follow these steps to set JAVA_HOME variable on your Windows system.
- Right-click the My Computer icon on your desktop and select Properties.
- Click Advanced system settings link.
- Click the Advanced tab.
- Click the Environment Variables button.
- Under System Variables, click New.
- Enter the variable name as JAVA_HOME
- Enter the variable value as the installation path for the Java Development Kit as something like this C:\Program Files\Java\jdk1.7.0_75
Example: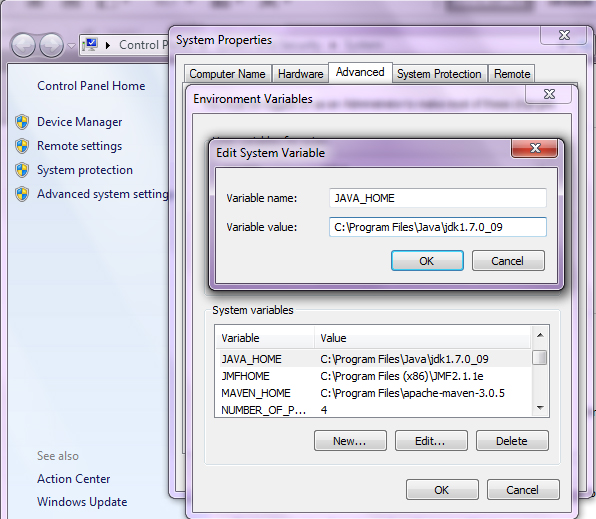
Now, JAVA should work.
2. Apache + MySQL + PHP
I recomand to use The Uniform Server as WAMP, instead of XAMPP from apachefriends.org
Uniform Server
A lightweight mobile WAMP Server Solution.The Uniform Server
http://www.uniformserver.com
Description
The Uniform Server is a lightweight server solution for running a web server under the WindowsOS. Less than 24MB! Modular design, includes the latest versions of Apache2, Perl5,
PHP (switch between PHP53, PHP54, PHP55 or PHP56), MySQL5 or MariaDB5, phpMyAdmin or Adminer4. Run from either hard drive or USB memory stick... NO INSTALLATION REQUIRED! NO REGISTRY DUST! Just UNPACK and FIRE UP!
Download and if you need help, visit theis forums at: http://forum.uniformserver.com
After you have The Uniform Server installed, your mySQL Server is ready.
Steps to setup your mySQL Server and database.
1. Change the "root" password.
http://wiki.uniforms.../MySQL_Security
Or with Navicat
Navicat
Install the gameserver sql databases
Aion-Core Developer needs innodb engine databases, not MYISAM.
How to setup this:
For example with Uniform Server
Locate your "my.ini"
F:\11_7_1_ZeroXI\UniServerZ\core\mysql\my.ini (database required: innodb)
Optional: Open with an editor and after the line;
#default-storage-engine=MYISAM
add
#InnoDB is faster for writes
default-storage-engine=INNODB
Restart mySQL
Gameserver
Open your navicat or other mySQL management utilities.
Select (click) your "Localhost" connection and make a new database.
New Database: ac47_server_gs
Select your new database "ac47_server_gs
Execute SQL File../import (example: F:\AC-Server\AC-Game\sql\ac47_server_gs.sql
Repeat exactly the above steps to make a Loginserver database
Select your new database "ac47_server_ls
Execute SQL File../import (example: F:\AC-Server\AC-Login\sql\ac47_server_ls.sql
Now, you have your databases ready
NOTE: remote access to database
If you have a dedicated server to host your Aion-Core Emulator and an other server your homepage, or simply you wish to remote access your mySQL Databases, you will need
to change some stuff as following:
Open Port 3306 (TCP) in Windows Firewall
Open Port 3306 (TCP) in router + 7777, 2106, 9014, 9021
Edit mySQL remote access in "my.ini"
For example with Uniform Server
Locate your "my.ini"
F:\11_7_1_ZeroXI\UniServerZ\core\mysql\my.ini
Change MySQL’s IP binding, change;
[mysqld]
bind-address=127.0.0.1
to
[mysqld]
#bind-address=127.0.0.1
Optional in your my,ini or my,cnf
#skip-networking
Restart mySQL
Grant remote access permissions to mysql server for external user
Select your local host connection
From the Navicat Menu, click on "Query" > New Query > Run
grant all privileges on *.* to 'voidstar'@'%' identified by 'OMG_tHis_is_mYpAssW0Rd##';
flush privileges;
Now you have remote access
Prepare the Loginserver database.
Select your "ac47_server_ls" and then the "gameservers" table.
Add:
Id:37
Mask:127.0.0.1 // do not add asterisk ( * )
Password: your_password
Save and Exit
Your server tree and setting up your configs:
- AC-Chat
- AC-Game
-
AC-Login
manager_universal_073b.exe
AC-Chat config
AC-Chat\config\chatserver.properties
Spoiler
# ----------------------------
# Chat Server Config's:
# ----------------------------

# CS will listen for connections on specified address
# need to be your external Ip of your Live server
chatserver.network.client.address = 127.0.0.1:10241

# Address that will be used by CS to listen for GS connections
chatserver.network.gameserver.address = 127.0.0.1:9021

# Password to match for successful authentication of the game server
# NOTE: Don't forget to add your password!
chatserver.network.gameserver.password = your_password

# log each channel request from client (debug purposes)
chatserver.log.channel.request = true

# Log requests to invalid channels (debug purposes)
chatserver.log.channel.invalid = true

# Log chat?
chatserver.log.chat = true

# Lang Chat
# 1 = English 7 = Swedish
# 2 = French 8 = Finnish
# 3 = German 9 = Norwegian
# 4 = Italian 10 = Greek
# 5 = Spanish
# 6 = Danish
chatserver.chat.lang = 1

# delay between messages. seconds. 0 to disable
# strongly recommended
chatserver.chat.message.delay = 10

# Specifies the frequency the chat server will be restarted
# Options: NEVER, DAILY, WEEKLY, MONTHLY
# Default: NEVER
chatserver.restart.frequency =

# Specifies the exact time of day the server should be restarted (of course respecting the frequency)
# Default: 5:00
chatserver.restart.time =
AC-Game config
AC-Game\config\network\database.properties
Spoiler
# ----------------------------
# Database Config's:
# ----------------------------

# This class represents database driver class that will be used while connecting to database
database.driver = com.mysql.jdbc.Driver

# This is database url.
database.url = jdbc:mysql://127.0.0.1:3306/ac47_server_gs?useUnicode=true&characterEncoding=UTF-8

# Database user
database.user = root

# Database password
# NOTE: Change this! Root password is not safe!
database.password = your_password
AC-Game\config\network\ipconfig.xml
Spoiler
<ipconfig default="127.0.0.1">
<!--
<iprange min="10.0.0.0" max="10.255.255.255" address="10.0.0.0"/>
<iprange min="172.16.0.0" max="172.31.255.255" address="172.16.0.0"/>
<iprange min="192.168.0.0" max="192.168.255.255" address="192.168.0.0"/>
<iprange min="127.0.0.1" max="127.0.255.255" address="127.0.0.1"/>
-->
</ipconfig>
AC-Game\config\network\network.properties
Spoiler
# ----------------------------
# Network Config's:
# ----------------------------

# Port that will be used to listen for client connections
gameserver.network.client.port = 7777

# Host that will be used to listen for client connections
gameserver.network.client.host = 127.0.0.1

# Maximum online players on the server
gameserver.network.client.maxplayers = 100

# Address of login server
gameserver.network.login.address = 127.0.0.1:9014

# Id of this game server
gameserver.network.login.gsid = 37

# Password of this game server
gameserver.network.login.password = your_password

# Address of chat server
# Ip and port of chat server should be accessible from
# 1) game server
# 2) all connected clients
gameserver.network.chat.address = 127.0.0.1:9021

# Password of this game server for chat server
gameserver.network.chat.password = your_password

# Number of extra threads dedicated only to read/write network data.
# Value < 1 means that acceptor thread will also handle read & write.
# Value > 0 means there will be x dedicated read/write threads + 1 acceptor.
gameserver.network.nio.threads = 1

# Number of threads (min) that will be used to execute client packets
gameserver.network.packet.processor.threads.min = 4

# Number of threads (max) that will be used to execute client packets
gameserver.network.packet.processor.threads.max = 4

# Threshold used to decide when packet processor thread should be killed
# It have effect only if min threads != max threads
gameserver.network.packet.processor.threshold.kill = 3

# Threshold used to decide when extra packet processor thread should be spawned
# It have effect only if min threads != max threads
gameserver.network.packet.processor.threshold.spawn = 50

# This will enable or disable the messages for unknown packets
gameserver.network.display.unknownpackets = false

# Enable flood protector
gameserver.network.flood.connections = false

# Flood ms in tick
gameserver.network.flood.tick = 1000

# Short period
gameserver.network.flood.short.warn = 10
gameserver.network.flood.short.reject = 20
gameserver.network.flood.short.tick = 10

# Long period
gameserver.network.flood.long.warn = 30
gameserver.network.flood.long.reject = 60
gameserver.network.flood.long.tick = 60
AC-Login Config
AC-Login\config\network\database.properties
Spoiler
#----------------------------
# Database Config's:
# ----------------------------

# This class represents database driver class that will be used while connecting to database
database.driver = com.mysql.jdbc.Driver

# This is database url.
database.url = jdbc:mysql://127.0.0.1:3306/ac47_server_ls?useUnicode=true&characterEncoding=UTF-8

# Database user
database.user = root

# Database password
# NOTE: Change this! Root password is not safe!
database.password = your_password
AC-Login\config\network\network.properties
Spoiler
# ----------------------------
# Network Config's:
# ----------------------------

# LoginServer will listen for connections on specified port
loginserver.network.client.port = 2106

# LoginServer will bind specified network interface
# * - bind all interfaces
loginserver.network.client.host = 127.0.0.1

# How many times player can try to login before he get's banned for bruteforcing
loginserver.network.client.logintrybeforeban = 5

# For what time in minutes player should be banned in case of bruteforcing
loginserver.network.client.bantimeforbruteforcing = 15

# Host that will be used by LS to listen for GS connections
loginserver.network.gameserver.host = 127.0.0.1

# Port that will be used by LS to listen for GS connections
loginserver.network.gameserver.port = 9014

# Nuber of additional threads for NIO that will handle only reading
loginserver.network.nio.threads.read = 0

# Nuber of additional threads for NIO that will handle only writing
loginserver.network.nio.threads.write = 0

# Create accounts automatically or not?
loginserver.accounts.autocreate = true

# Set if the server is in maintenance or not / only gm can login
loginserver.server.maintenance = false

# Set gm level for maintenance mode(Default 3)
loginserver.server.maintenance.gmlevel = 3

# Enable\disable flood protector from 1 ip on account login
loginserver.server.floodprotector = true
loginserver.server.bruteforceprotector = true

# Checking gs if it still alive
loginserver.server.pingpong = true
loginserver.server.pingpong.delay = 3000

# flood manager
# legal reconnection time. if faster - ban for loginserver.network.client.bantimeforbruteforcing min
# seconds
network.fastreconnection.time = 5

# Ip's excluded from flood protection
loginserver.excluded.ips = 127.0.0.1
You will need only to setup your preferences in the config folders: administration & main
Aion-Core Gameserver setting has bin finished.
Starting your Aion-Core Gameserver
Basic Hardware requirements:
Homeserver:
Windows 7 x64
RAM: min.8GB (3GB for Chat,Game and Loginserver + 1GB for GeoData + 1GB for Aion Client (if you play on the same computer) + OS + mySQL Server.
HD: very fast SATA III or SSD
Dedicated server:
Windows 2008 R2 or higher x64. (Windows Server 2012 R2)
RAM: min.16-24
HD: very fast SATA III Raid0 or SSD
@echo off
start bin32\aion.bin -ip:192.168.x.x -port:2106 -cc:1 -lang:enu -noweb -nowebshop -nokicks -ncg -noauthgg -ls -charnamemenu -ingameshop -DEVMODE "con_disable_console 0" -DEVMODE "g_chatlog 1" -DEVMODE "g_auto_disconnect 0"
exit
## ================================================================================================================================== ##
Gameserver ID and Names
Retail serveral Server were merged, but for private Servers you can still use the followings:
#Server IDs
#1 : Siel
#2 : Israphel
#3 : Nezekan
#4 : Zikel
#5 : Vaizel
#6 : Triniel
#7 : Kaisinel
#8 : Lumiel
#9 : Yustiel
#10 : Marchutan
#11 : Ariel
#12 : Azphel
#13 : Fregion
#14 : Mesramtaeda
#15 : Ereshkigal
#16 : Beritra
#17 : Tiamat
#18 : Changarnerk
#19 : Quairerk
#20 : Kidorun
#21 : Meniherk
#22 : Zemurru
#23 : Kasaka
#24 : Lugbug
#25 : Fasimedes
#26 : Jucleas
#27 : Michalis
#28 : Calon
#29 : Sakmis
#30 : Lavirintos
#31 : Spatalos
#32 : Telemachus
#33 : Castor
#34 : Perento
#35 : Gorgos
#36 : Kromede
#37 : Thor
#38 : Votan
#39 : Balder
#40 : Urtem
#41 : Vidar
#42 : Suthran
#43 : Aegir
#44 : Nerthus
#45 : Deltras
#46 : Kahrun
#47 : Lephar
#48 : Arbolu
#49 : Kalil
#50 : Vindacci
#51 : Balsach
#52 : Sataloca
#53 : Hellion
#54 : Orissa
#55 : Sigyn
#56 : Sif
#57 : Freyr
#58 : Jebal
#59 : Hisui
#100 : Test Server
Phew! That took a lot longer to compile than I expected. Not sure the late game is worth so much dedication.
Okay, I know, you don't need to tell me. There is no actually Tutorial for Aion Private Server Install & Setup.
And I'm very sure that there was never such a Tutorial written.
So if you like it and use it, feel free to Donate a few thousand dollars and if you have no money, I will accept a 
Copyright 2010-2015, by Voidstar, Aion-Core Developer (www.aion-core.net)
NOTE:
Do not distribute this tutorial (content and pics) in any form without my copyrights, or (credits) deleted, omitted, etc...
Thanks.
Voidstar
Recommended Comments
There are no comments to display.
Join the conversation
You can post now and register later. If you have an account, sign in now to post with your account.